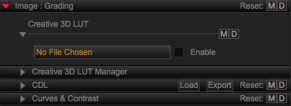
Image: Grading
To add the Image: Grading group to a panel while using IPP2 controls, right-click in a panel and select Image: Grading.

Figure: Image: Grading
If a 3D LUT file is loaded, select the Enable check box to disable the currently loaded 3D LUT.
NOTE: For more information on how to load a 3D LUT, go to Creative 3D LUT Manager.
Creative 3D LUT Manager

Figure: Creative 3D LUT Manager
Creative 3D LUT Manager allows you to make cubes that map color. To add a 3D LUT, follow the instructions below:
- Click the Edit... drop-down and perform one of the following:
- Select Import....
- Select Browse Library....
NOTE: Browse library... opens a folder that contains existing 3D Luts that you want to use in other projects.
- Navigate to the desired 3D LUT file.
- Click Open.
CDL

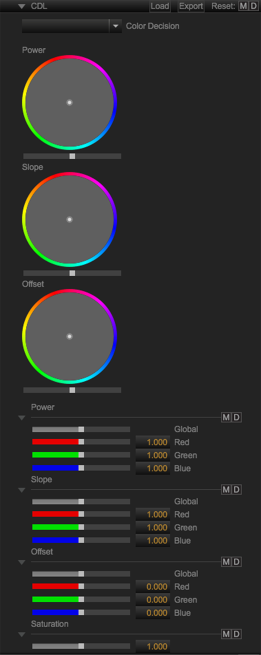
Figure: CDL
Load CDL
To load a CDL file, follow the instructions below:
- Click Load.
- Find and select the desired file.
- Click OK.
Export CDL
To export a CDL file, follow the instructions below:
- Click Export.
- Type a name for the file and select a destination.
- Click Save.
Color Decision
The Color Decision drop-down populates once you load a CDL. If multiple CDLs are in one file, the drop-down can be used to select the desired CDL.
NOTE: Multiple CDL files are unable to be loaded at once.
Adjust CDL Channels
To adjust the CDL settings, perform one of the following:
- Click and drag the white point inside of the color wheel to the desired location.
- Click and drag the Global slider.
- Click and drag the Red, Green, and Blue sliders.
- Enter a new value in the Red, Green, and Blue fields.
Power
This group allows you to adjust the Power image characteristics:
|
Channel |
Description |
Range |
Default |
|---|---|---|---|
|
Global |
Increase/decrease the Red, Green, Blue channels uniformly. |
0.000 to 2.000 |
1.000 |
|
Red |
Increase/decrease the gain of the Red channel |
0.000 to 2.000 |
1.000 |
|
Green |
Increase/decrease the gain of the Green channel |
0.000 to 2.000 |
1.000 |
|
Blue |
Increase/decrease the gain of the Blue channel |
0.000 to 2.000 |
1.000 |
Slope
This group allows you to adjust the Slope image characteristics:
|
Channel |
Description |
Range |
Default |
|---|---|---|---|
|
Global |
Increase/decrease the Red, Green, Blue channels uniformly. |
0.000 to 2.000 |
1.000 |
|
Red |
Increase/decrease the gain of the Red channel |
0.000 to 2.000 |
1.000 |
|
Green |
Increase/decrease the gain of the Green channel |
0.000 to 2.000 |
1.000 |
|
Blue |
Increase/decrease the gain of the Blue channel |
0.000 to 2.000 |
1.000 |
Offset
This group allows you to adjust the Offset image characteristics:
|
Channel |
Description |
Range |
Default |
|---|---|---|---|
|
Global |
Increase/decrease the Red, Green, Blue channels uniformly. |
0.000 to 2.000 |
0.000 |
|
Red |
Increase/decrease the gain of the Red channel |
0.000 to 2.000 |
0.000 |
|
Green |
Increase/decrease the gain of the Green channel |
0.000 to 2.000 |
0.000 |
|
Blue |
Increase/decrease the gain of the Blue channel |
0.000 to 2.000 |
0.000 |
Saturation
This effect allows you to adjust the Saturation of the image:
|
Effect |
Description |
Range |
Default |
|---|---|---|---|
|
Saturation |
Increase/decrease the intensity of color |
0.000 to 2.000 |
1.000 |
Curves & Contrast

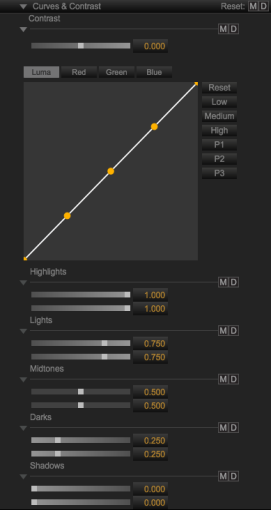
Figure: Curves & Contrast
Curves & Contrast enables you to adjust the contrast, highlights, lights, midtones, darks, and shadows to improve the look of your R3D footage. This group allows you to adjust the following image characteristics:
|
Effect |
Range |
Default |
|---|---|---|
|
Contrast |
–1.000 to 1.000 |
0.000 |
|
Highlights |
0.000 to 1.000 |
1.000 |
|
Lights |
0.000 to 1.000 |
0.750 |
|
Midtones |
0.000 to 1.000 |
0.500 |
|
Darks |
0.000 to 1.000 |
0.250 |
|
Shadows |
0.000 to 1.000 |
0.000 |
Adjust the Tonal Curve
To adjust the tonal curve, choose one of the following methods:
- Tonal Curve: Click and drag the curve.
- Curve Settings: Expand Curve Settings to click and drag the sliders or enter a value.
Tonal Curve Presets
To create and use your own tonal curve preset, follow the instructions below:
- Go to the Image: Curve tab.
- Select a preset or adjust the tonal curve.
- Click and hold the preset number for three (3) seconds to save tonal curve settings to the preset.