Install the RED ROCKET and HD-SDI Slot Filler
WARNING: The computer system that you are installing the RED ROCKET in works with voltages that can be hazardous to your health.
Follow the instructions below to install the RED ROCKET:
-
Ensure that the system is turned off.
-
Wait 5–10 minutes to ensure that the system components cool down.
-
Unplug the power cable and all external cables from the system.
WARNING: Never work on the system or access its interior while any power cables are plugged in.
-
Touch the metal on the outside of the computer to discharge any static electricity from your body.
NOTE: To avoid generating static electricity while installing the RED ROCKET, DO NOT walk around the room until you have completed the installation and closed the system.
-
Remove the access panel so that you can access the PCIe slots.
-
Remove the PCI bracket from the PCI slot in the computer where you want to install the RED ROCKET.
IMPORTANT: On most Mac Pro towers, you should install the RED ROCKET in only one of the two (2) lower slots.
NOTE: The RED ROCKET must be installed in a slot providing at least eight lanes that are PCIe x8 electrical in a physical x16 slot for power.
CAUTION: During the next step, use care not to break off any parts of the PCI video board. Apply pressure to the slot panel and/or the printed circuit board only, and NOT to any of its attached parts.
-
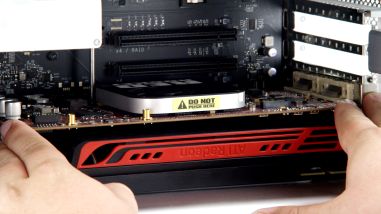
Line up the RED ROCKET connectors with the slot, and then gently but firmly press the card into the slot.

Figure: Insert RED ROCKET
NOTE: To prevent damage to your system and the RED ROCKET, DO NOT rock the card or use excessive force when installing the RED ROCKET.
-
If necessary, fasten the RED ROCKET into the slot.
-
If you are using the HD-SDI slot filler, follow the instructions below to install and connect the HD-SDI slot filler:
-
Remove one (1) free slot bracket from the system.
-
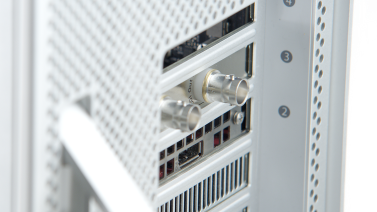
Slide the HD-SDI slot filler into the empty slot so that the SDI Out B connector is toward the back.

Figure: Install HD-SDI Slot Filler
CAUTION: Ensure that the HD-SDI slot filler or connectors DO NOT contact other components inside the computer.
-
If necessary, fasten the HD-SDI slot filler into the slot.
-
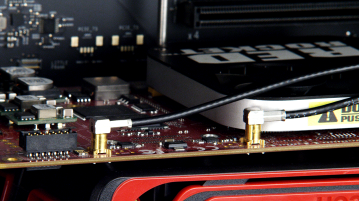
Connect the SDI Out A cable on the HD-SDI slot filler to the SDI Out A connector on the RED ROCKET.
-
Connect the SDI Out B cable on the HD-SDI slot filler to the SDI Out B connector on the RED ROCKET.

Figure: Connect HD-SDI Slot FIller to RED ROCKET
-
-
Reinstall the access panel.
-
Reconnect all cables to the system.
-
Power on the system.
-
To install or upgrade the RED ROCKET driver and firmware, go to Install Driver and Firmware.