RED BRICK Charger

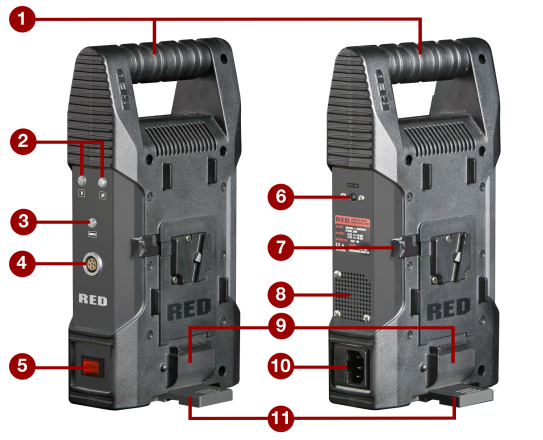
Figure: RED BRICK Charger
The RED BRICK Charger offers rechargeable support for RED BRICK (153 Wh) and REDVOLT-V (43 Wh) lithium-ion batteries. The RED BRICK Charger provides up to 4.75 A in constant current mode. The RED BRICK Charger charges two (2) attached RED BRICK batteries sequentially in approximately six (6) to eight (8) hours. The RED BRICK Charger charges (2) attached REDVOLT-V batteries sequentially in approximately two (2) to four (4) hours. The RED BRICK Charger can charge one (1) fully discharged RED BRICK in approximately three (3) hours and one (1) fully discharged REDVOLT-V in approximately two (2) hours.
The RED BRICK Charger also serves as a power supply using the 6-pin 0B auxiliary output port.
WARNING: DO NOT exceed 100 W power draw from the 6-pin 0B auxiliary output port.
NOTE: The RED BRICK Charger stops charging automatically if battery temperature exceeds 40˚C (104˚F), or drops below 0°C (32°F).
Prepare the RED BRICK Charger
When the RED BRICK Charger is brand new, it may be difficult to connect and disconnect the V-plate adaptor on the RED BRICK or REDVOLT-V. RED recommends that you perform a break-in sequence with a new RED BRICK Charger. Before charging a RED BRICK or REDVOLT-V in the charger, fully engage and then disengage the RED BRICK or REDVOLT-V approximately 20 times.
RED BRICK Charger Connections and Features

Figure: RED BRICK Charger
|
# |
Connector/Feature |
Description |
|---|---|---|
|
1 |
Carrying handle |
Robust carrying handle |
|
2 |
Battery charging LEDs |
Indicates battery charge state |
|
3 |
Auxiliary port LED |
Indicates auxiliary connection state |
|
4 |
LCD/EVF auxiliary port |
13.8 V/100 W |
|
5 |
Power switch |
Toggles power to the charger on/off |
|
6 |
DC input |
22 V/5 A Max |
|
7 |
Battery release |
Eject battery from charger |
|
8 |
Ventilation |
Provides airflow to cool internal components |
|
9 |
Battery contact connector |
RED BRICK or REDVOLT-V seating connector |
|
10 |
AC main input |
IEC power cable in |
|
11 |
Rotating support foot |
90° rotation for balanced free-standing operation with batteries connected |
RED BRICK Charger LED Indicators
|
COlor Pattern |
Description |
|---|---|
|
Green |
Charger on, battery fully charged |
|
Green flashing (1 second interval) |
Charger on, battery waiting to charge |
|
Green/Amber flashing (alternating) |
Charger on, battery almost fully charged |
|
Amber |
Charger on, battery charging |
|
Amber flashing |
Charger on, battery charging (pre-charge) |
|
Red/Green flashing (alternating) |
Charger on, fail condition |
|
Red |
Charger on, battery charging failure |
|
Red flashing (0.5 second interval) |
Charger on, battery charging (low voltage) |
|
Red flashing with pause |
Charger on, battery charging paused |
Recharge RED BRICKs
- Connect the RED BRICK Charger to a 100–240 VAC, 50/60 Hz power outlet.
- Turn on the RED BRICK Charger using the power switch.
- Align and lower the RED BRICK or REDVOLT-V into the V-plate adaptor.
- Charge the battery until the LED indicator turns green, signalling a fully charged battery.
- Press the release tab and remove the battery by pulling it up and off of the RED BRICK Charger.
NOTE: When a 6-pin 0B is connected to the auxiliary power output, the charging process is suspended. The auxiliary LED illuminates and the battery LEDs on the charger flashes green. Once the cable is unplugged, the RED BRICK Charger resumes charging.