Recover Media on Windows
To recover media on a Windows® operating system, follow the instructions below:
- Create a folder on your computer where you want to save recovered .R3D files.
WARNING: Available hard disk space on your computer must be at least the size of the total storage space on the RED® media being recovered.
NOTE: In this example, we create a folder on the D drive labeled “RecoveryFolder” for the recovered files. The path for this folder location on your hard drive is “D:/RecoveryFolder”.
-
Use the appropriate docking station to connect the RED media to your computer.
- Click the Windows Start button in the taskbar.
- Type cmd.
- Under Programs or Best Match, right-click cmd or Command Prompt and select Run as administrator.
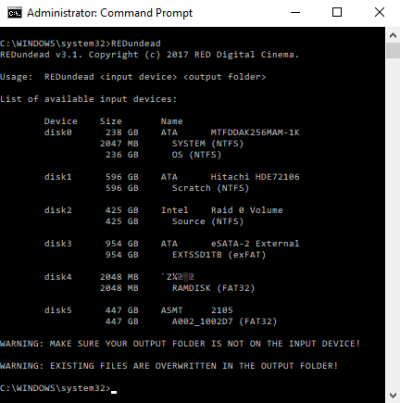
- Type REDundead into the command prompt line and press Enter.
NOTE: Recognized media device(s) appear and are numbered as “disk1”, “disk2”, “disk3”, etc.

Figure: Type REDundead
- Determine the source path and disk number for the disk that you want to recover.
If a list of disks does not appear, type echo list disk | diskpart and press Enter.
- After identifying the correct REDMAG™ disk and source path, type the following to match the REDundead disk5 D:/RecoveryFolder format, where:
- disk5: Is the correct number for the REDMAG disk identified earlier.
- D:/RecoveryFolder: Is the output destination where the recovered file will be written.
WARNING: Do not select the REDMAG as the output destination for the recovered files as it will cause all data to be lost.
- Press Enter.
- Enter your computer password if prompted.
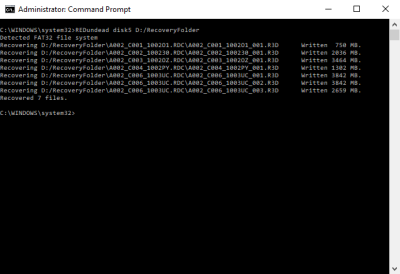
REDUNDEAD® begins to recover files from the media device. This operation may take awhile. Files display in the terminal window as they are found and rewritten.
NOTE: To stop the recovery process, press CTRL +Z. Files that have already recovered remain. Any files currently processing stop at the current location.
- Wait for the terminal window to display Recovered # files. indicating REDUNDEAD is complete.

Figure: Recovery Folder Command Prompt
- Open the destination folder to verify files that were successfully recovered.
NOTE: RED recommends that you unmount the drive from Disk Utility before physically removing it from the computer. This helps to prevent unintended corruption of the drive and/or files.