REDMOTE Controls, Connectors, and LEDs
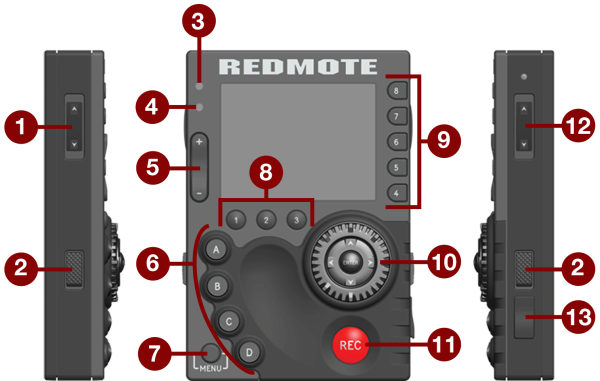
This section describes the REDMOTE controls, connectors, and color LCD display.

Figure: REDMOTE
The following table describes default REDMOTE control actions. Each control is also programmable.
|
# |
REDMOTE Control |
Description |
|---|---|---|
|
1 |
Stills/Motion Switch |
Toggles between Stills/Motion Mode, enabled in v6.0 firmware or later |
|
2 |
Release Buttons |
Press and hold to undock the REDMOTE |
|
5 |
Rocker Switch |
Up: Iris open; Down: Iris close |
|
6 |
User Function Keys |
Go to Default Key Functions |
|
7 |
Menu Button |
Toggle between basic and advanced menus |
|
8 |
Soft Menu Buttons (1-3) |
|
|
9 |
Soft Menu Buttons (4-8) |
|
|
10 |
Navigation Group |
Go to Navigation Group |
|
11 |
Focus/Record Button |
Half press initiates auto focus; full press toggles record start/stop |
|
12 |
Power/Lock Switch |
Go to Power/Key Lock Switch |
|
13 |
Mini-USB Power Port |
Charges the internal battery; upgrade firmware |
For a full list of default user key actions for the REDMOTE, go to Default Key Functions.
REDMOTE LEDs
There are two (2) status LED indicators located above the rocker switch on the left side of the LCD display.
|
# |
REDMOTE LED |
Color/Flashing |
Description |
|---|---|---|---|
|
3 |
Power/Recording LED |
Red |
Camera startup; camera recording |
|
4 |
Status/Connectivity LED |
Green |
Camera ready; REDMOTE connected |
|
Green flashing |
Searching/Establishing communication |
REDMOTE Soft Menu Buttons (1-3)
There are three (3) Primary Soft Menu Buttons located below the left side of the REDMOTE LCD. These buttons provide quick access to REDMOTE advanced operations.
- Button 1: Access Connect Menu.
- Button 2: Toggle between Local and Remote Modes.
- Button 3: Access Setup Menu.
REDMOTE Control Modes
Press Button 2 to toggle between Remote Mode and Local Mode. The current mode displays on the REDMOTE LCD, directly above the Primary Soft Menu Buttons. Use the Scroll Wheel and Directional Keys to navigate with the cursor. For more information, go to Navigation Group.
- Local Mode: Navigate menus using the REDMOTE controls and display.
- Remote Mode: Navigate menus with REDMOTE controls, using an attached LCD, EVF, or other monitor as a reference.
NOTE: When in Remote Mode, the current menu item does not display on the REDMOTE.
REDMOTE Setup
The Setup Menu includes:
- Turn Wireless On/Off: Toggles the RED Command Protocol (R.C.P.) wireless link on/off.
- Setup System: Provides access to REDMOTE settings.
- Setup Slot: Program the menu slots on the REDMOTE LCD.
Setup System
The Setup System Menu allows you to change REDMOTE settings and shows the MAC address and REDMOTE firmware version.
The following adjustable settings are available:
- Brightness: LCD backlight intensity. Set the value to maximum for daylight visibility, or reduce it for standard operation and prolonged battery life. Default is Maximum.
- Volume: Volume of the REDMOTE speaker. Default is Minimum.
- Auto Shutdown: Amount of inactivity time before the REDMOTE turns off automatically. Default is off.
Navigation Group
Use the Navigation Group to navigate the camera menus and change settings.
- Scroll Wheel: Select and adjust the value of a selected setting.
- Directional Keys: Navigate menus.
- ENTER: Press ENTER to confirm a setting or access the selected menu.
Power/Key Lock Switch
- Turn on: Press and hold the switch in the down position for two (2) seconds.
- Turn off: Press and hold the switch in the down position for five (5) seconds. Or, press the switch down into the down position and release to access the Shutdown menu.
- Lock keys: Move the switch to the up position to prevent unintentional operation. “KEYS LOCKED” displays above the Primary Soft Menu Buttons when lock is enabled.