Control
To adjust the input, pre-amplifier, and headphone settings, select Control.
Channel 1/2 and Channel 3/4
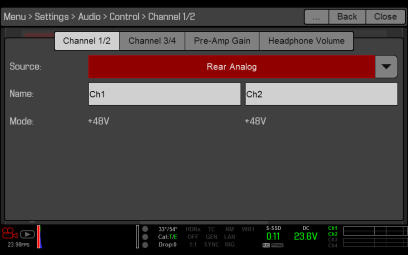
To set up Channel 1/2 and 3/4, go to Menu > Settings > Audio > Control.

Figure: Channel Setup
Source
|
Source Name |
Channel Pairs |
Connectors |
|---|---|---|
|
None |
N/A |
N/A |
|
Camera Internal |
Ch1/Ch2, Ch3/Ch4 |
Mic 1, Mic 2 |
|
Rear Analog |
Ch1/Ch2, Ch3/Ch4 |
AUDIO (full-size XLR) |
Name
You can rename each audio channel. The default names are Ch1, Ch2, Ch3, and Ch4. The channel names display in the Audio Meter, but are not included in the clip metadata.
Mode
When Rear Analog is selected, the Mode (Line, Mic, or +48V) displays for the incoming audio signal.
Phantom Power
The 5-pin XLR connector provides +48 V phantom phantom power.
Enable phantom power (via the switch adjacent to the XLR port) after a microphone is connected. Disable phantom power (by switching to Line or Mic) before removing the microphone.
Pre-Amp Gain
Pre-amp gain range is 0 dB to 55 dB. Default is 0 dB.
To adjust amplification levels, follow the instructions below:
- Go to Menu > Settings > Audio > Control > Pre-Amp Gain.
- Move the Pre-Amp (pre-amplifier) sliders up and down to adjust the amplification levels.
- To link the amplification for each channel, select Link.
Headphone Volume
Headphone volume range is –54 dB to 0 dB. Default is 0 dB.
Change Headphone Volume
- Go to Menu > Settings > Audio > Control > Headphone Volume.
- Move the Left and Right sliders up and down to adjust the volume.
- To toggle mute/unmute, select Mute.
- To link the volume for Left and Right, select Link.