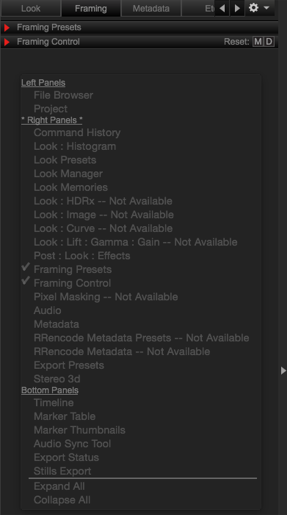
Panels
The paneled interface is designed to retain its shape and function, while being flexible enough to meet your needs. Panel borders are adjustable, enabling you to customize the size and space needed for your work.
You can perform the following actions:
- Show/Hide Panels:
- Click anywhere on a panel border that has a light gray arrow to show/hide a panel.
- Press Shift+Tab to show/hide all panels.
- Resize Panels: Hover the cursor over a panel border and drag the cursor until the panel is the size that you want.

Figure: Panels
Tabs
You can add, populate, delete, move and rename tabs in any panel.

Figure: Tabs
- Add Tab: To create a tab, perform one of the following:
- Click
 (Gear Menu) in any panel and select Add Tab....
 - Right-click any of the existing tab headers and select Add....
- Click
- Populate Tab: Right-click a panel and select a group from the group drop-down menu.
- Delete Tab: To delete a tab, perform one of the following:
- Click
 (Gear Menu) and select Delete Tab....
 - Right-click the tab and select Delete....
- Click
- Move Tab: Drag a tab to a location that you want in the panel.
- Rename Tab: To rename a tab, perform one of the following:
- Click
 (Gear Menu) and select Rename Tab....
 - Right-click the tab and select Rename Tab....
- Click
Tab group Options
You can add a tab in any panel with the following groups:
|
Group |
Description |
Details |
|---|---|---|
|
Audio |
View and synchronize audio clips |
Edit and Sync Audio |
|
Audio Sync Tool |
Synchronize audio clips |
Sync Audio with Auto Match |
|
Command History |
View command history |
N/A |
|
Export Presets |
Set export presets |
Export with Presets |
|
Export Status |
Status of export |
N/A |
|
File Browser |
Browse files |
Browse Clips |
|
Framing Control |
Frame and crop R3D footage |
Frame Adjustments |
|
Framing Presets |
Create frame presets |
|
|
Image: Curve2 |
Adjust the curve of an R3D file |
Image: Curve |
|
Image: Demosaic1 |
Recreate a full color image from the abridged color output |
|
|
Image: Grading1 |
Apply creative qualities to R3D footage |
|
|
Image: HDRx® |
Adjust HDRx |
Image: HDRx |
|
Image: Histogram |
Adjust the Histogram |
Image: Histogram |
|
Image: Lift: Gamma: Gain2 |
Adjust the Lift, Gamma, and Gain |
Image: Lift: Gamma: Gain |
|
Image: Look2 |
Adjust the appearance of R3D footage |
|
|
Image: Output Transform1 |
Maps the tone from an image that has more color then the device can display |
Image: Output Transform |
|
Image: Primary1 |
Adjust the technical qualities of the R3D image |
|
|
Look Manager |
Manage Looks |
Look Manager |
|
Look Memories |
Set Look Memories |
Look Memories |
|
Look Presets |
Set Look Presets |
Look Presets |
|
Marker Thumbnails |
View marked frames in thumbnail view |
Marker Thumbnails |
|
Marker Table |
View marked frames |
Marker Table |
|
Metadata |
Metadata information for the active R3D in the Viewer |
View R3D Metadata |
|
Pixel Masking |
Adjust hot pixels in recorded footage |
|
|
Post: Image : Effects |
Adjust the appearance and settings of R3D footage |
Post: Image: Effects |
|
Project |
Organize R3D files |
Create a Project |
|
Stereo 3D |
Edit 3D clips |
Edit 3D Clips |
|
Stills Export |
Export stills |
Stills Export |
|
Timeline |
Add/modify clips |
Add R3D Files to a Project or Timeline |
|
RRencode Metadata Presets |
Set RRencode Presets3 |
RRencode Workflow |
|
RRencode Metadata |
View RRencode Metadata3 |
- Only available while using IPP2 controls.
- Only available while using Legacy controls.
- Only available when you install RRencode. For more information, go to REDRAY.